How do I create Shared Folders to share items internally?
Sometimes it is necessary to share login details or other secrets within external teams, or even external parties. “Shared Folders” can be helpful for this.
Shared Folders are different from normal (private) folders, as everyone who has access to that shared folder can use the secrets located therein.
Note however that when an item is located within a Shared Folder, it cannot be further shared with a recipient who is not already a member of that Shared Folder.
Creating a shared folder
To create a new Shared Folder within your LastPass Vault, do the following:
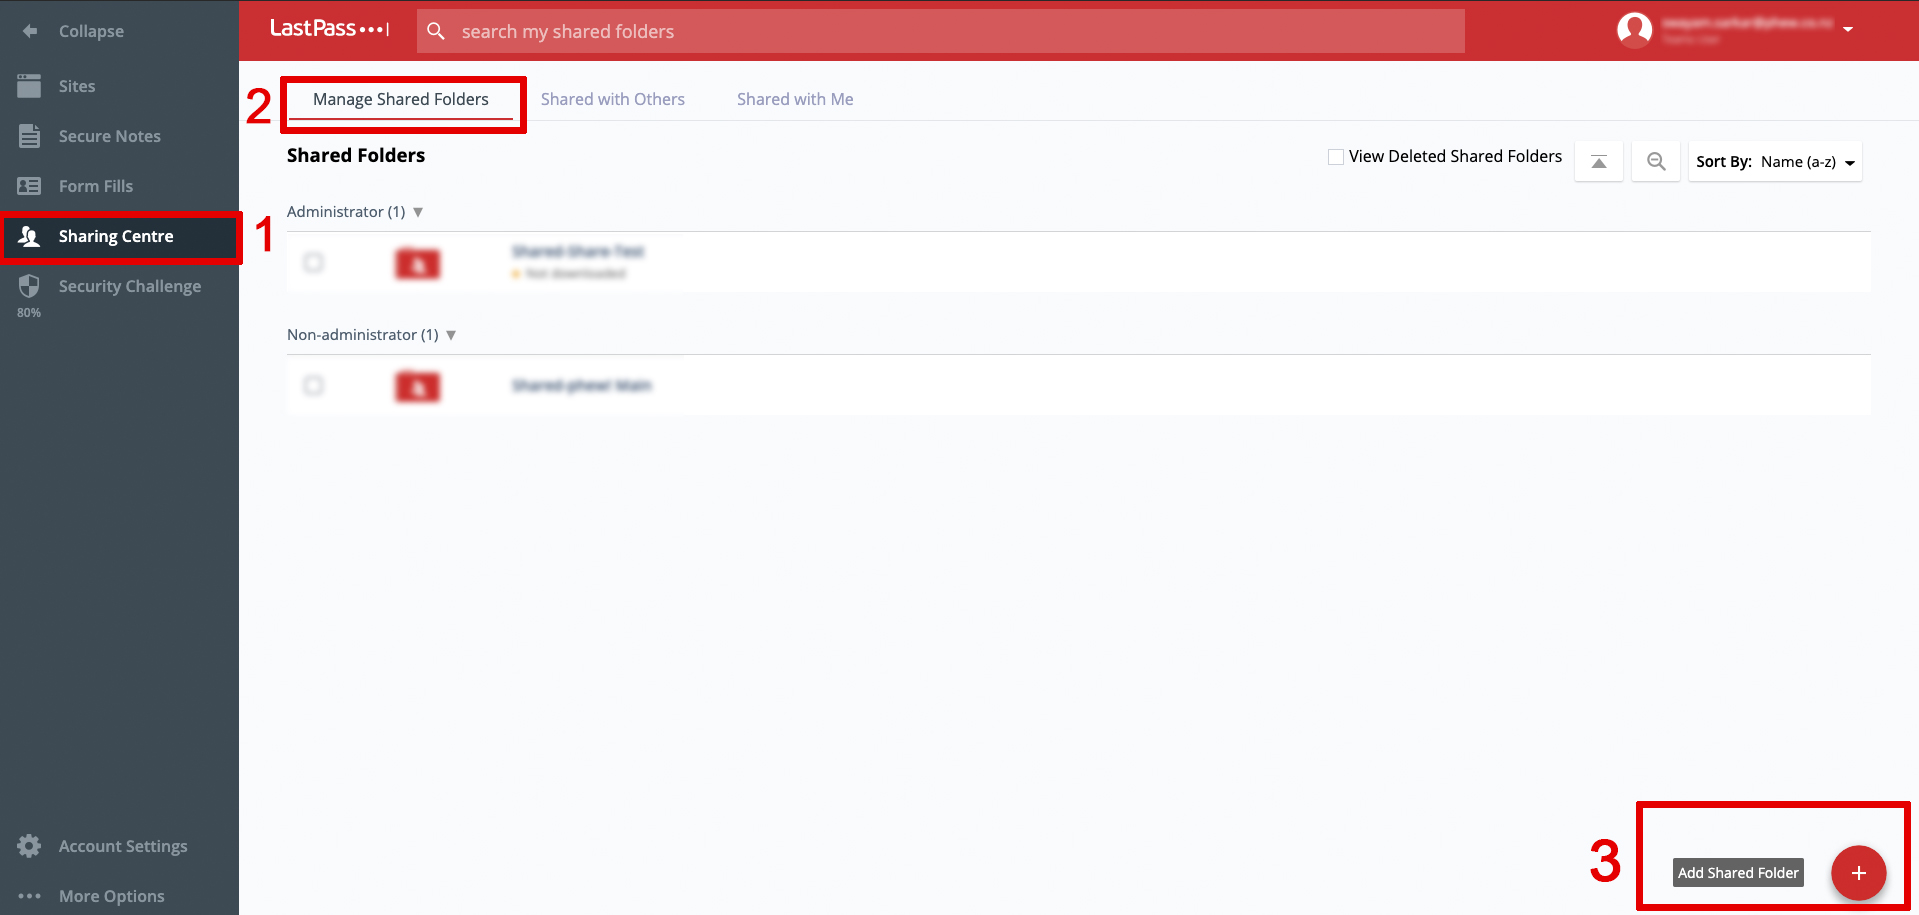
- Log in to LastPass and access your Vault.
- Click on Sharing Centre in the left navigation.
- Click the Manage Shared Folders tab at the top, then click Add Shared Folder.
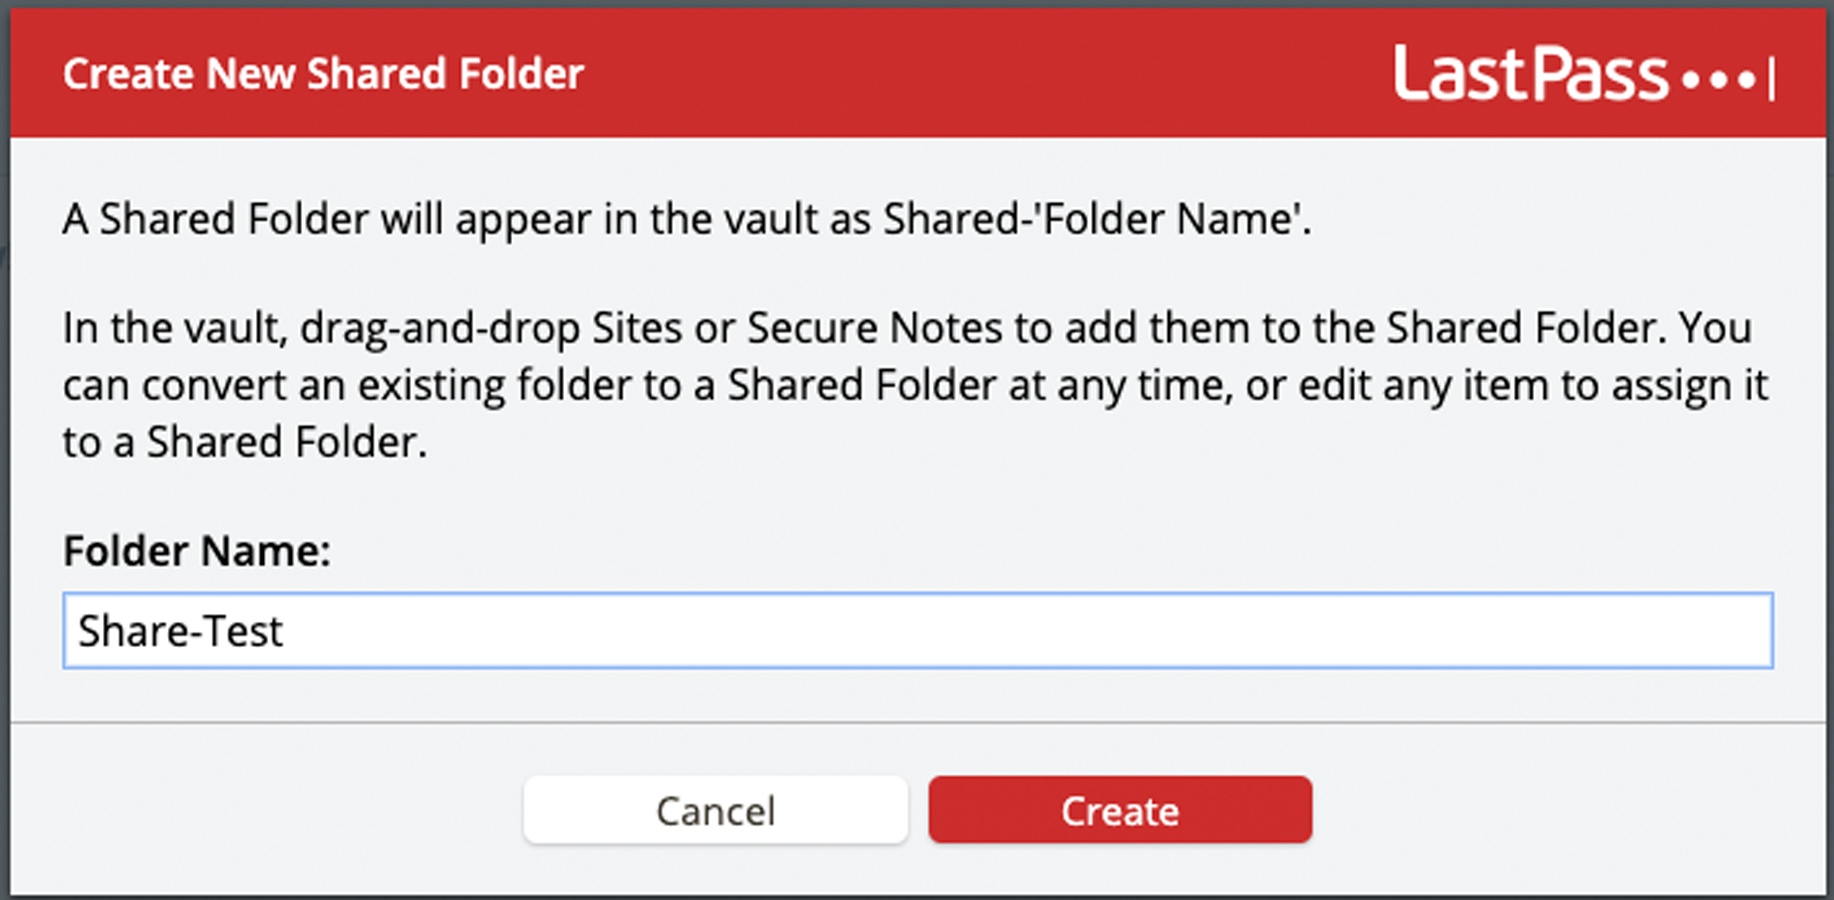
- Choose a name for your Share Folder and then click Create.
- Your new shared folder now appears within the Manage Shared Folders tab in the Sharing Centre, as well as within Sites and Secure Notes.
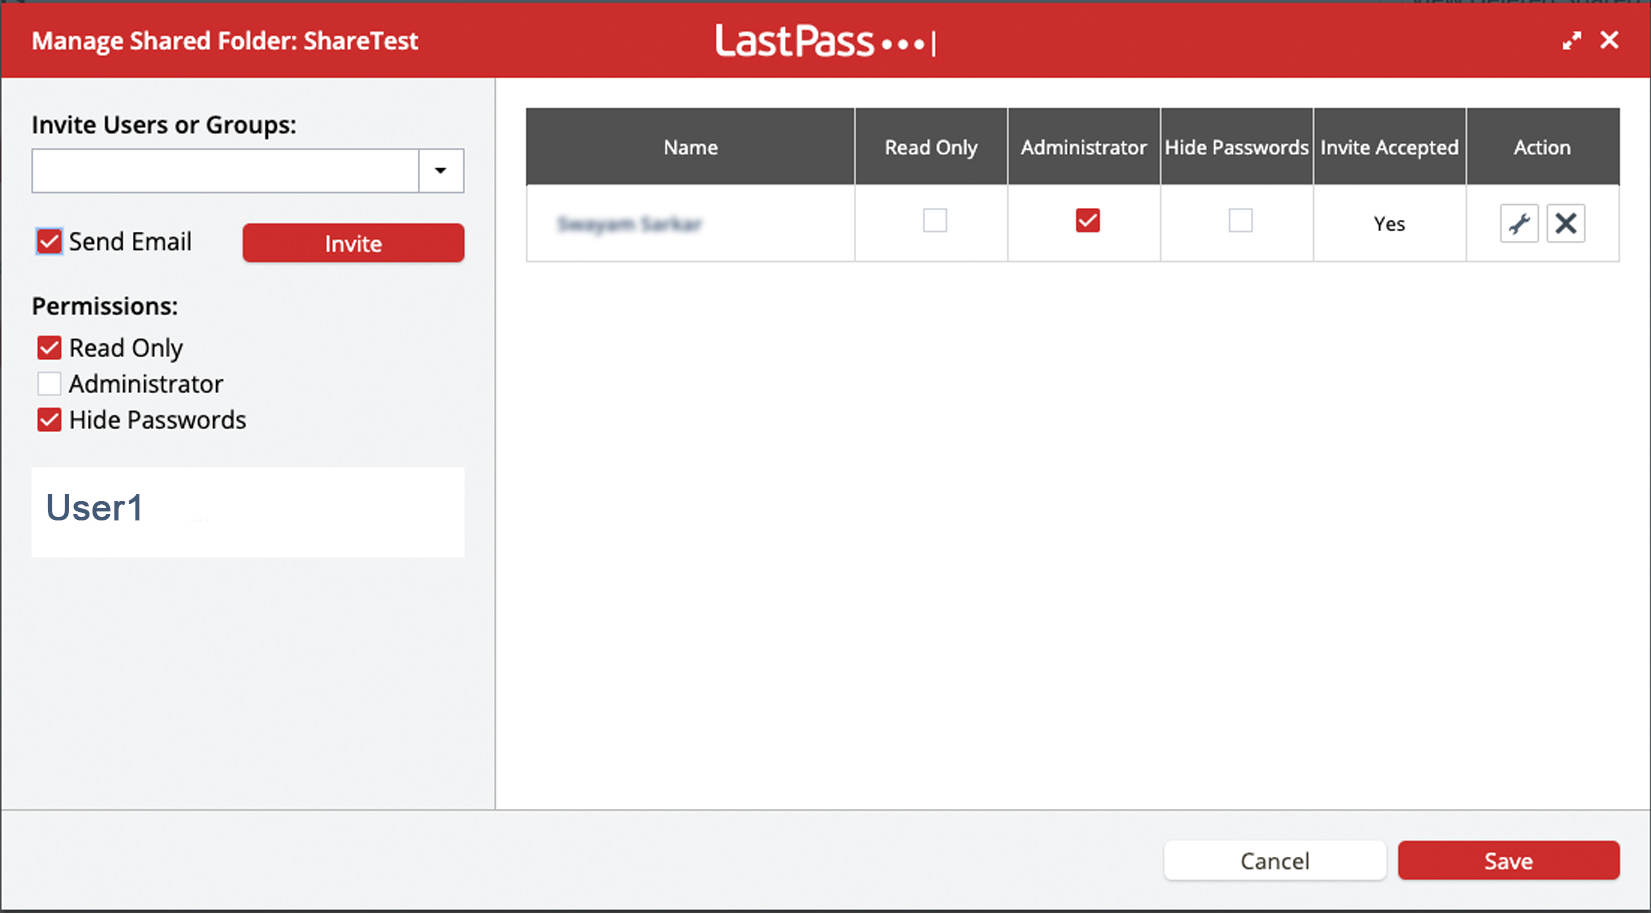
- From Manage Shared Folders tab in the Sharing Centre right-click the folder and click Manage Folder.
- Use the Invite User or Group section to add Users to access this shared folder.
- Type in the email address of that user/s and check the send email button.
- Provide the User with specific permissions. You can choose from the following access permissions:
- Administrator: Members can edit sites in a shared folder and invite others to the folder.
- Read only: Members can view items in the shared folder but are unable to edit or invite others.
- Tick hide password if you don’t want them to see the password for the Site. Note that very technical users can still see such hidden passwords if they know what they are doing, so don’t treat this option as truly secure.
- Once done, click save and the user(s) will receive an email notification regarding their invitation to this Shared Folder.

Moving items into a shared folder
Note:
- You are unable to move items that have been shared with you (individually) to your own Shared Folder.
- You are unable to move items into a Shared Folder if they have been shared with other people individually. You should remove those shares first.
- Once an item has been added to a Shared Folder it can no longer be shared with someone else who is not a member of that Shared Folder.
- If sharing of an item is restricted, the main/only way you will know that is that the sharing icon is simply missing!
You can move items from your Vault into a shared folder, or transfer items from one folder into a shared folder in various ways.
Drag-and-drop
- In your LastPass Vault, click Sites or Secure Notes in the left navigation.
- Click on the relevant item, and drag it to your desired folder. If you want to move multiple items at once, enable the checkbox in the upper-right corner of each.
- When prompted, click Yes to confirm that you want to move the item(s).
Right-click
- In your LastPass Vault, click Sites or Secure Notes in the left navigation.
- Right-click on the relevant item, and select Move to folder then select your desired shared folder. If you want to move multiple items at once, enable the checkbox in the upper-right corner of each.
- When prompted, click Yes to confirm that you want to move the item(s).
Action menu
- In your LastPass Vault, click Sites or Secure Notes in the left navigation.
- Enable the checkbox(es) in the upper-right corner of the relevant item, then click the Actions drop-down menu and select Organize or Move to Folder, then select your desired shared folder.
- When prompted, click Yes confirm that you want to move the item(s).
Edit a Site or Secure Note
You can also move an item to a shared folder when you are editing it.
Moving items out of a shared folder
If you move items out of a shared folder (and into a standard folder or your Vault), any user with whom those items have been shared will no longer have access to them.
Note: If you are deleting your LastPass account, you are required to move all items out of your shared folders before your account can be closed.
- In your LastPass Vault, click Sites or Secure Notes in the left navigation.
- Select and move your desired item(s) using the drag-and-drop, right-click, Action menu, or edit the method listed above in the previous section.
- Select your desired standard folder (the folder name will not begin with “Shared”) or select (none) to send the item(s) to your Vault.
- When prompted with a message that others will lose access to these shared items, click Yes to proceed.
Deleting a shared folder
- Move all items out of your shared folder into a standard (non-shared) folder
- Remove all assigned users from the shared folder.
- Delete the (now empty) shared folder (go to Sharing Center in the left navigation > Manage Shared Folders > click the Delete icon
 > Yes to confirm).
Converting a folder to a shared folder
If you have organised your Sites and/or Secure Notes by using standard folders, you can easily convert any folder to a shared folder as follows:
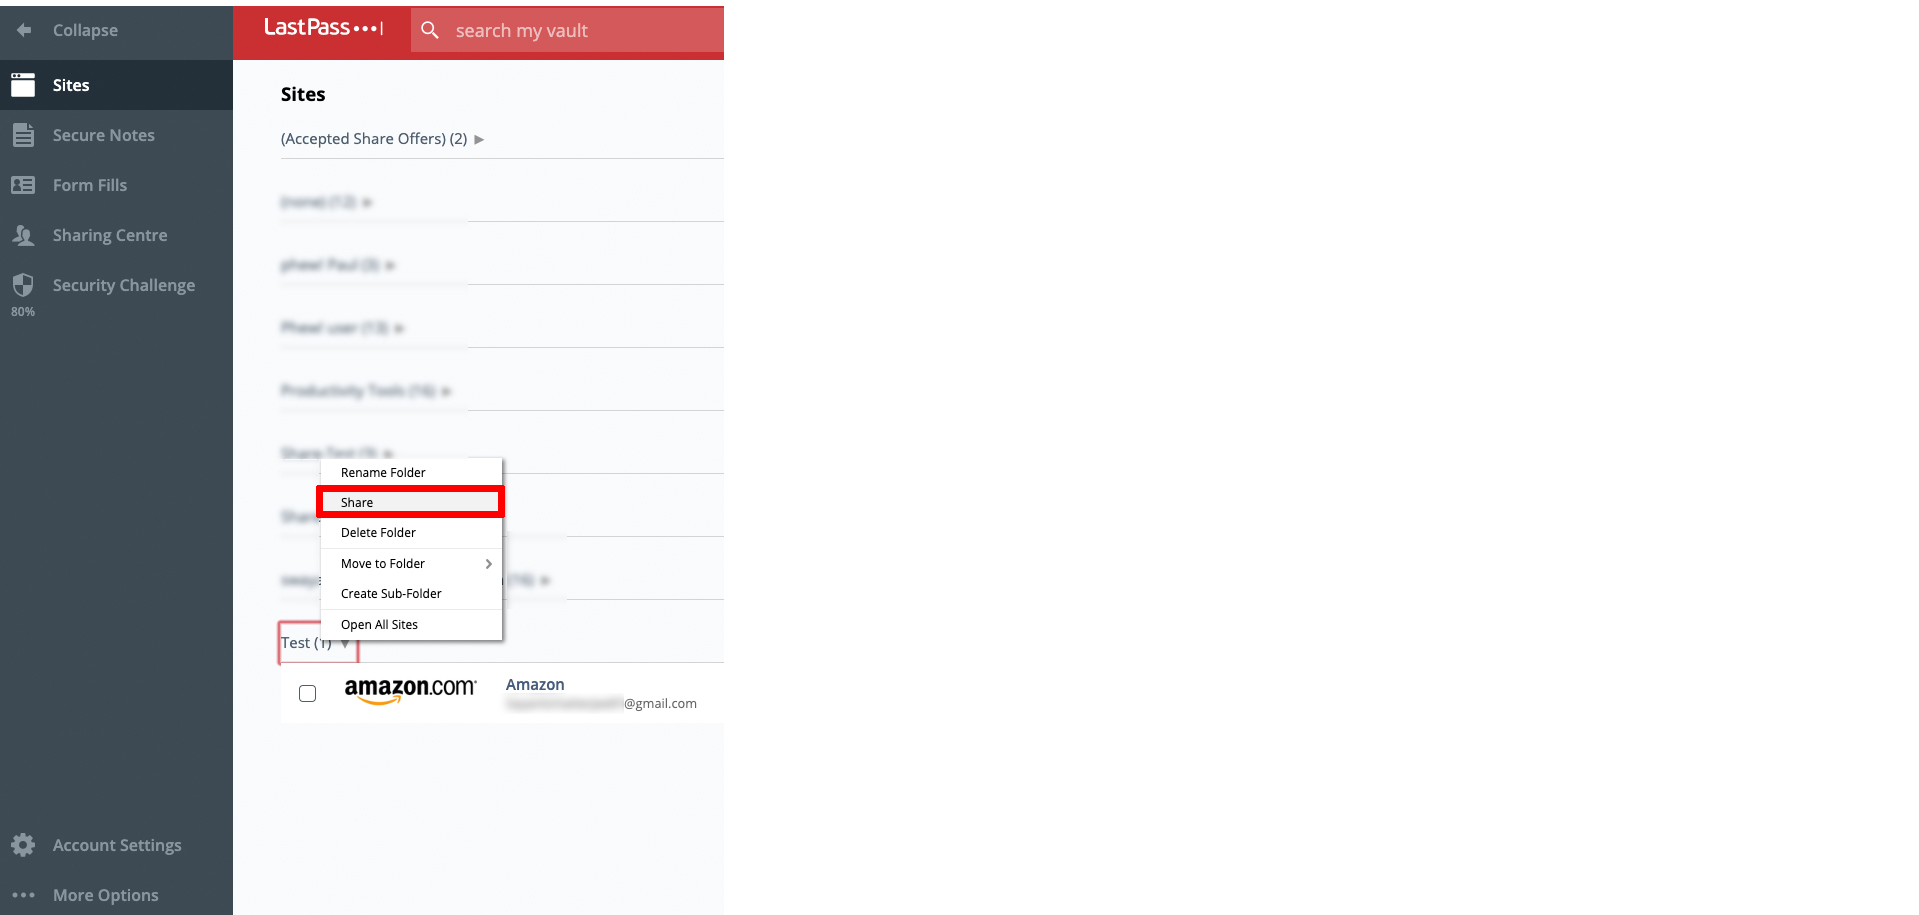
- In your LastPass Vault, click Sites or Secure Notes in the left navigation.
- Right-click on your desired folder, then select Share.
- Create a Name for your Share Folder and click Create.
- Your new shared folder now appears within the Manage Shared Folders tab in the Sharing Centre, as well as within Sites and Secure Notes.
- From Manage Shared Folders tab in the Sharing Centre right-click the folder and click Manage Folder.
- Use the Invite User or Group section to add Users to access this shared folder, by typing in their email address and sending. Remember to choose their access permission:
- Administrator: Members can edit sites in a shared folder and invite others to the folder.
- Read only: Members can view items in the shared folder but are unable to edit or invite others.
- Once done, click save and the user/s will receive an email notification regarding this Share.

About hidden passwords for items within shared folders
When you share an item, regardless of whether you enable the “Allow Recipient to View Password” option, you should be aware of the following:
- Savvy end users could potentially access the password if they capture it using advanced techniques (but LastPass themselves will never be able to access this data).
- It is also possible to obtain shared passwords using another password manager.